Ever wonder what your voice sounds like to others? Chris Beatty from VocalCoach.com will show you a tip, so that you know how.

Welcome to The Official Recording, Mixing, & Mastering Music Blog.
Showing posts with label tutorial. Show all posts
Showing posts with label tutorial. Show all posts


Mixing Vocals : The Ultimate Guide to EQ’ing Vocals By Chris Huff
Mixing vocals could be considered the most important part of your mixing job. For instance, people will tolerate a poor acoustic guitar mix when the vocals shine through. This isn’t to say you shouldn’t put effort into creating an all-around solid mix. My point is that when the vocal mix suffers, everyone notices. How do know your vocal mix was bad? Have you ever heard these complaints; “I couldn’t hear the lead singer,” “I couldn’t understand what they were singing,” or the worst complaint, “they sounded terrible, what happened?”
This vocal mixing guide gives you the information needed for creating a solid vocal mix every time. By the end of this guide, you’ll know what you need to do, when you need to do it, and how to do it.
How To Do Your Own Audio Mastering With Bob Oswinski
Bob Oswinski shows you how to master with the TRacks software plug-ins.
Pensado's Place - How To Fix Over De-ess'd Vocals - Into The Lair #85
Pensado's Place - How To Fix Over De-ess'd Vocals - Into The Lair #85
Dave Pensado shows you how to fix De-ess'd vocals.
Pensado's Place - 5 Plugins You Should Know - Into The Lair #91
Pensado's Place - 5 Plugins You Should Know - Into The Lair #91
Finding the key to any song
FREE PDF on "minor chord trick" athttp://www.hearandplay.com/landing/pi...
Jermaine Griggs of Hearandplay.com teaches you how to find the key of any song... 30 minute lesson.'
Audio course on how to find the key:http://www.hearandplay705.com
Jermaine Griggs of Hearandplay.com teaches you how to find the key of any song... 30 minute lesson.'
Audio course on how to find the key:http://www.hearandplay705.com
Pro Tools: How To Use the Tap Tempo | WinkSound
Subscribe to WinkSound: http://bit.ly/WinkSoundSubscribe
Watch more Pro Tools video tutorials here:http://bit.ly/WinkSoundProTools
This tutorial explains how to use the Tap Tempo feature within Pro Tools 8 allowing you to extract the tempo from imported audio files.
Keep up to date with the latest music production videos from WinkSound:
YouTube - http://www.youtube.com/winksound
WinkSound Mobile Apps: http://bit.ly/WinkSoundMobile
Twitter - https://twitter.com/#!/WinkSound
Tumblr - http://blog.winksound.com/
Instagram - http://web.stagram.com/n/winksound/
Watch more Pro Tools video tutorials here:http://bit.ly/WinkSoundProTools
This tutorial explains how to use the Tap Tempo feature within Pro Tools 8 allowing you to extract the tempo from imported audio files.
Keep up to date with the latest music production videos from WinkSound:
YouTube - http://www.youtube.com/winksound
WinkSound Mobile Apps: http://bit.ly/WinkSoundMobile
Twitter - https://twitter.com/#!/WinkSound
Tumblr - http://blog.winksound.com/
Instagram - http://web.stagram.com/n/winksound/
Mastering Audio by Bob Katz
Uploaded on Apr 16, 2008
Buy the book from Amazon here: http://bit.ly/6h5Mqg
Bass Frequency Surgery tutorial by Bob Katz, author of Mastering Audio (9780240808376) by Focal Press.
Bass Frequency Surgery tutorial by Bob Katz, author of Mastering Audio (9780240808376) by Focal Press.
The Smart Tool
Introduction

It is likely that the first things you were shown during your introduction to Pro Tools were the tools available at the top of the edit window. You will see the Zoom tool, Trim tool, Selectiontool, Grabber tool, Scrub tool and finally, the Pencil tool.
You will also notice that there is a small bar which surrounds the Trimmer, Selection andGrabber tool, click this and you will activate the Smart Tool.
Quick Tip: You can also activate the Smart Tool using the shortcutF6 + F7 (or F7 + F8)
Setting Up Busses
Introduction
In this tutorial we will be looking at ‘bussing’, for those who are not familiar with the term, it basically refers to the routing of signals whether it be for sub-mixing or for feeding a side-chain.
For this tutorial we will be working in the common production situation of routing a number of vocal tracks to a single fader so that effects and level adjustments can be applied in one place. While this tutorial in particular will reference using vocal tracks, the same process can be used within your Pro Tools session on anything you like whether it be to create a drum bus or even a sub-master fader to control the level of your mix before it hits the master fader…
Why Use Busses?
Bussing can have a number of benefits to your production, sessions that feature a lot of tracks can be hard to control so you need to use every trick possible to help you throughout the process. Imagine you have set the levels of each of your vocal tracks but you then decide that all of the vocals tracks need to be quieter within the mix, you can either go through the hassle of grouping the tracks together and then ungrouping them when you want to make individual adjustments, or, you could simply send them to a bussed fader from which you will have an overall control to make any group adjustments you require.
Take the same situation, you have a number of vocal tracks within a session but you feel that they all need a little reverb to help them sit a little better in the mix, rather than wasting valuable processing power applying the effect to each individual vocal track, you can simply bus send them to an effects channel and apply the effect once instead.
Now that we know what it is and how it will benefit your sessions, let’s have a look at setting it up within Pro Tools…
I/O Setup
Let’s start by creating and labelling the bus. As per usual, all things to do with routing within Pro Tools will involve starting work in the I/O Setup window which can be found under theSetup menu as shown below.

Navigate to the Bus tab at the top of the window which will display all available busses in your current session, it is worth mentioning at this point that the number of busses available will differ between systems, an expanded HD system will offer more busses than that of an LE system for example.

We will now create the bus, this can range from a mono bus all the way up to a surround bus (depending on your system) but for the purpose of this tutorial we will combine a number of panned mono vocal tracks so we will therefore use a stereo bus. Choose a spare slot in the bus window, assign its channels (they will be set to one mono track for the left and right sides by default – as below) and then label it appropriately.

Quick Tip: The bus names can be changed by double clicking on the text field
Creating The Bus Input
We now need to create the track which will receive the signals we are going to send via the bus. For this we will use an Auxiliary Input Track; from the Track menu select ‘New…‘ and then choose the settings as shown below.

Quick Tip: The new track dialogue window can also be opened using the shortcut Command_Shift_N (mac) Control_Shift_N(windows)

Please note that for this tutorial we are using a stereo bus so will therefore require a stereoauxiliary track, if you were working with a number of mono signals which were not panned, then a mono bus and mono auxiliary track would work fine.
Routing To The Bus
Now we are simply left with the task of routing the required tracks to the newly created aux track. Remember that bus that we set up right at beginning in the I/O setup window? Well this is where that will finally come in to play…
Set the Input of the newly created track to the bus you created earlier as shown below. This will mean that every track sent to the bus is recieved on this track. For session management purposes, let’s also rename the auxiliary track to ‘Vocal Bus’.

Now lets look at sending our vocal tracks to the ‘Vocal Bus’ track.
As you can see in the screenshot below, I have four vocal tracks in this session which I have routed to the vocal bus, all I needed to do was change the output of the vocal audio tracks to the bus created earlier and the signals will now route through the vocal bus track.

Quick Tip: You can quickly assign the output to a number of tracks by selecting them, and then setting the output of one of the selected tracks while using the shortcut Option_Shift (mac)Alt_Shift (windows).
Making Use Of The Bus
So there you have it you have created and applied a bus within Pro Tools, as mentioned at the beginning of this tutorial, this will now allow you to control the level of the combined bussed tracks from a single fader. You can also add effects to the auxiliary bus fader which will be applied to all sounds routed through it, it is worth mentioning that any insert effects placed on the original audio tracks which have been routed through the bus will be sent as well.
Final Words
We hope you have enjoyed this tutorial and that it will help you during your future productions. Please leave a comment below telling us how you have used bussing in your session or tweet us on our Twitter account
Pro Tools Tips & Tutorials: Busses and Aux Sends
Uploaded on Apr 12, 2011
a Pro Tools tutorial demonstrationg basic Bus routing and setting up Aux Sends and Returns
The Complete Guide to Audio Pass Filters
The Complete Guide to Audio Pass Filters
An audio pass filter attenuates an entire range of frequencies. There are two types of pass filters (Fig. 1). A high-pass filter (HPF) attenuates content below a cutoff frequency, allowing higher frequencies to pass through the filter. A low-pass filter (LPF) attenuates content above a cutoff frequency, allowing lower frequencies to pass through the filter.
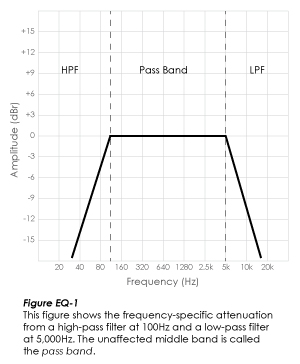
The slope of filter attenuation is usually quantified in decibels per octave. For example, a 12dB per octave HPF located at 100Hz would accomplish 12dB of relative attenuation at 50Hz, and 24dB at 25Hz. This slope would continue to extend into very low frequencies, effectively attenuating signal to an indiscernible amplitude.
Pass filters are simple, ubiquitous audio tools that should be a part of ever engineer’s basic toolbox. Here are some effective ways to incorporate pass filters into your recording and mixing technique.
Signal v. Noise
In physical terms, signal and noise are not separate components of an audio signal. Though you may choose to think of them as discrete elements, noise is a part of every waveform. Some types of noise components are relatively isolated to a specific frequency range. In those cases, pass filters can be excellent tools to reduce of eliminate the offending signal content.
For example, high-pass filters are often used in studio recording and sound reinforcement to attenuate extraneous low-frequency content like mechanical rumble or vocal plosives. By choosing a filter with a cutoff frequency below the fundamental frequency range of the program, a HPF can be used to differentiate between program signal and low-frequency noise.
Low-pass filters can also be used to eliminate unwanted, counter-productive bandwidth. One common example is using a LPF to establish the limited bandwidth of a low frequency transducer, like a ‘sub’ mic on a kick drum. Other examples include the entire universe of subtractive synthesis.
Course Tone Control
The subjective quality that we call ‘tone’ or timbre is a result of the harmonic content of a signal. Harmonic content is the balance, or relative loudness relationships, between the component harmonics of a complex waveform. An equalizer changes tone by attenuating or amplifying a limited frequency range within a complex waveform.
As described above, audio pass filters establish the limited audible bandwidth of a signal. This can have very useful tonal results.
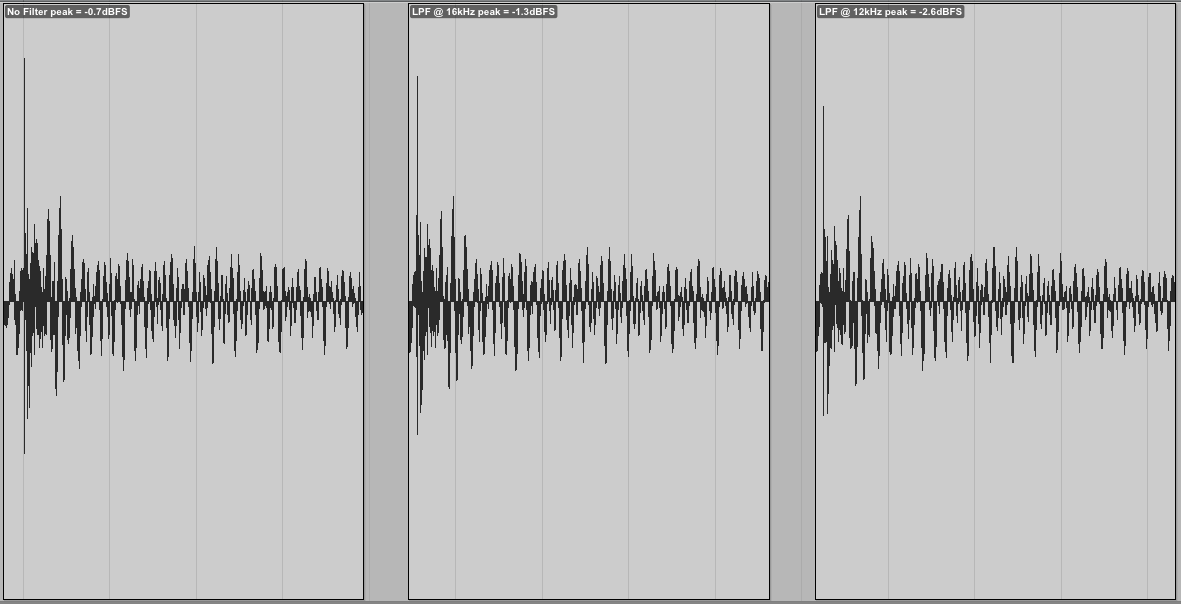
Low-pass filters are used in music production as both fixed and modulated tone controls. The most transient elements of any waveform are the direct contribution of that waveform’s highest harmonic content. Consequently, dramatic changes in tone can be achieved by changing the cutoff frequency of a LPF (Figure 2).
- A waveform unfiltered, LPF @ 16kHz and LPF @ 12kHz, showing 1.9dBFS difference in peak amplitude
Pass filters are often used in combination with shelving EQ to check or limit the effect of the shelf beyond the filter’s cutoff frequency. For example, some engineers like to use a Baxandall type shelving EQ to boost very high ‘air band’ frequencies. Placing a low-pass filter after the high-frequency boost in signal flow will provide additional control over the tonal effect.
The very same technique can be used to shape low-frequency content, in this case matched with a high-pass filter.
Pass Filters and Distance
High frequency content is one of the most important cues our auditory system uses to sort out proximity. A low-pass filter can be used very effectively to mimic the sensation that one signal is further away from the listener than another (unfiltered) signal. This technique can be used very quickly, and easily to establish spatial contrast between two signals, especially if they’re separated in the stereo field.
Try using a low-pass filter on the output of a delay. As the cutoff frequency of the delay component is reduced, you should expect to hear a more ‘realistic’ spatial separation between the direct signal and the delay. LPF cutoff frequencies in the 2kHz-5kHz range are typical.
Once the LPF is established, try introducing a high-pass filter as well. Cutoff frequencies in the 100Hz-250Hz range will exaggerate the spatial effect even more. Add a little slow delay modulation and you have one of those fancy “vintage” delay plugins using the freebie plugs that came with your DAW.
High-pass Filters and Mix Clarity
Many of the most common problems with mixes (from mixers of all experience levels) are the result of monitoring problems. One of the most common monitoring issues is inaccurate low frequency reproduction. If you’re not using full-range monitors in a well-treated room, there are low-frequency truths about your mixes that might (or should) surprise you.
Here are some warning signs:
- You prefer the sound of your mix on headphones, ear buds, car audio, etc.
- There are one or more instruments in your mix that seem to eat up headroom disproportionately.
- Your compressors keep pumping, but you can’t hear why.
- The midrange clarity of your mix is unstable/inconsistent.
If mix problems stem from a lack of monitoring accuracy, it’s fair to ask, “how am I supposed to address the problems in the very same room?” Very fair, but there are some options.
If it’s a compression-related issue, don’t compress. If you can’t bring yourself to bypass a compressor, use a pre-compressor HPF on the track in question. Try moving the filter to the sidechain of the compressor once you’ve established an effective cutoff frequency. One or a combination of these approaches will keep just about any signal from pumping.
Turn off any vocal compression and listen to your vocals for clarity and lyrical intelligibility.
- If they’re OK, then your vocal compression is the problem. See above.
- If the vocals become muddled, turn off any mix buss compression you might have on the master fader or group masters.
- Without the buss compression, listen for low frequency content that happens during the inconsistent vocal clarity.
- Try adding a HPF to any suspicious busses or their compressor sidechains until the vocal clarity returns.
- Re-instate the vocal compression and be sure that the fix holds.
None of these steps requires you to actually hear the offending low-frequency content. Rather, you can learn to listen for the results of this unfiltered audio, and address the problem deductively.
The list of helpful applications of pass filters goes on and on. The basics might not be inventive, but hearing fundamental technique in action is exciting. Try adding filters to your first-pass mixing technique. You might find yourself introducing them earlier and earlier in the recording process.

Subscribe to:
Posts (Atom)
